Satellite Tracker
The tracking widget can be used to automate reception of satellites.
There are three supported configurations with the tracker:
Manual (stand-alone): manually select a satellite and view information about it.
Semi-automatic: manually select a satellite and start the tracking, then automatically control an antenna rotator during that specific satellite pass.
Full automatic (scheduler): automatically select a satellite according a schedule, start a SDR automatically, select a pipeline, control a rotator and process the pass automatically.
Tracker Interface
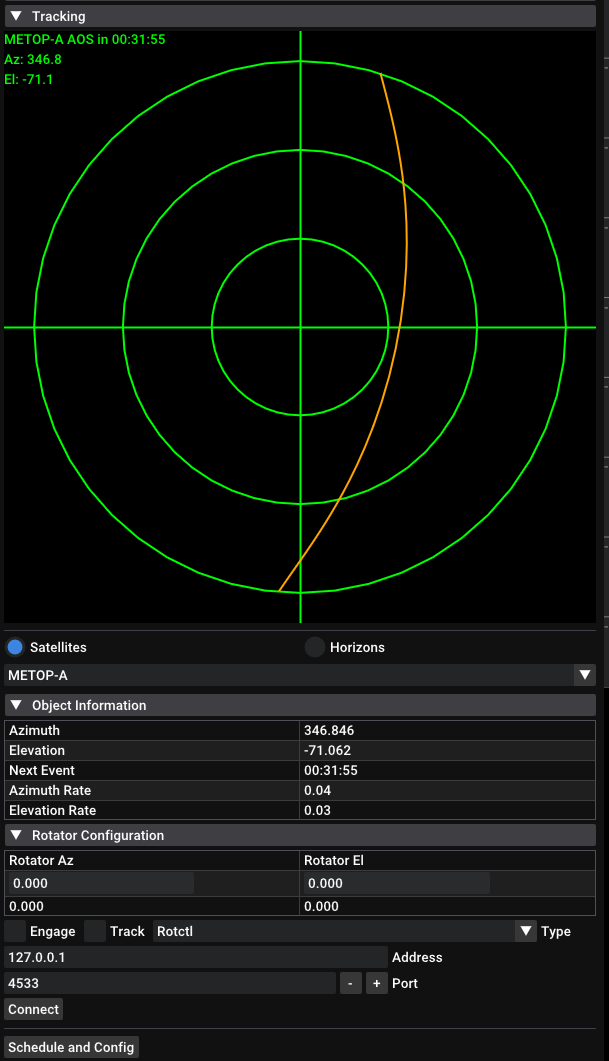
Polar Plot
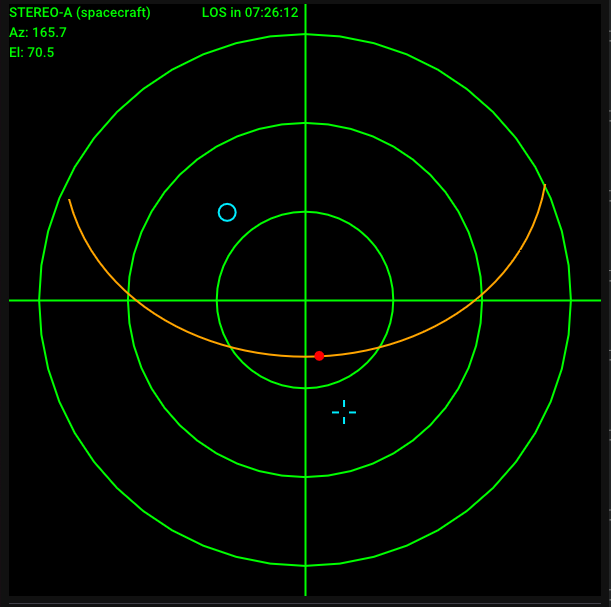
The polar plot is a chart of azimuth and elevation. The top of the plot is 0° azimuth, the right is 90° azimuth, bottom is 180°, and left is 270°. The center of the plot represents 90° elevation, while the first ring from the center is 60°, the second is 30°, and the outer ring is 0° (horizon).
Orange line: represents the path of the satellite
Red dot:: represents the position of the satellite
Blue cross: represents the target attitude of the rotator
Blue circle: represents the actual attitude of the rotator
In the top left corner, some information about the spacecraft is shown:
Name of the spacecraft
Current location information
Acquisition of signal / loss of signal times
Satellite Selector

The satellite selector allows you to choose which object you are
tracking. It has 2 modes, Satellites and Horizons.
Satellites
The Satellites mode will read from a list of TLEs (downloaded by SatDump).
Horizons
The Horizons selects out of Earth orbit spacecrafts from NASA’s Horizons system.
Note
The Horizons mode will take a few moments to load, as it requests data from JPL’s servers. For this reason, it will not work without an Internet connection.
Object Information
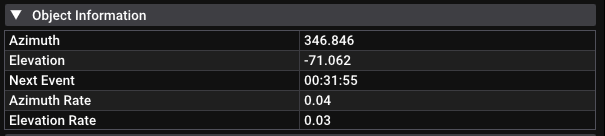
Displays information about the object you are tracking:
Azimuth
Elevation
Next AOS / LOS events
Rate of change of azimuth or elevation
Interfacing SatDump with an antenna rotator
SatDump features support for satellite tracking using a generic antenna rotator interfacing through third party rotator controller daemons such as Hamlib’s rotctld and YO3DMU’s PstRotator.
While Hamlib rotctld and PstRotator handle the hardware communications requirements and the specific rotator protocols and configuration, SatDump communicates with these apps at software level using a common protocol.
This allows SatDump to agnostically control and command every type of rotator supported by these two daemons without having to deal with complex or specific rotator settings.
Such option allows to have either the rotator controller connected directly to the same PC where SatDump is running, but also to connect via network to a remote different computer that handles the rotator, for example in a shack.
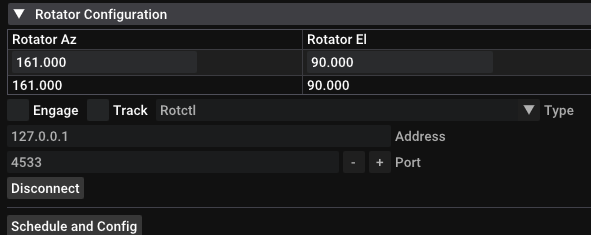
Rotator UI
Rotator AzandRotator Elcontrol and display the rotator position.- The first row is an editable text box that shows the latest commanded position.
These will be automatically updated when a satellite is being tracked.
If the selected satellite is below horizon or not being tracked, you can manually enter the desired position (for example, to test the rotation).
The second row shows the actual position reported by the rotator, where is it pointing currently. In order to work, the rotator daemon must be running and connected to SatDump.
Engage: enables the sending of position commands to the rotator. Whenever a new position is written andEngageis enabled, the rotator will be commanded to go there.Track: enables tracking. When enabled, the position entry text box will be automatically updated with the satellite position while it is above the horizon or the expected AOS position if it’s not in sight yet.Protocol Selection: selects the protocol or type of controller daemon you want to use. Currently, only rotctl and PstRotator are supported.
Note
PstRotator is untested. Rotctl is preferred and highly recommended.
Controller Daemon TCP/IP Settings: allows configuration of the network communication settings with the controller daemon. *
Address: IP address of the computer where is the controller daemon server running.Note
Enter
127.0.0.1if Rotctld or PstRotator are running on the same computer as SatDump is, or the remote computer IP if the daemon is running on a different computer.Port: Defines the TCP port where is listening the daemon server.4533is Rotctld’s default port, while
4002is the default for PstRotator.
Connect/Disconnect. This button connects and disconnects from thedaemon server controller.
Schedule and Configopens a window containing theSchedulingtab and aRotator Configtab. The Rotator Config tab contains the
 Update Periodtext box. This is the refresh rate for the rotator controller expressed in seconds. This value defines the polling and rotating intervals.
Configuration with Hamlib’s rotctld
This guide only cover the basic instructions for Rotctld. Please refer to Hamlib’s documentation and guide for details on how to download and install it, as well to setup your rotator.
Launch the rotctld app with the settings required for your specific hardware rotator controller.
Go to SatDump and select
rotctldin the configuration panel.Type the IP Address and TCP port as required (4533 the default port).
Click
Connect.Click
Engageto start sending commands to the rotator.

Configuration with PstRotator
Note
PstRotator is untested. Rotctl is preferred and highly recommended.
This guide only cover the basic instructions for PstRotator. Please refer to YO3DMU’s PstRotator Website for details on how to download and install it, as well to setup your rotator. Most of the configuration steps in PstRotator only needs to be done one time as it will save the settings when closed.
Using PstRotator protocol
Note
This method is not recommended. PstRotator’s rotctld protocol emulation should be used instead.
Launch PstRotator and configure the settings for your specific hardware rotator controller.
On the Communication Menu, select and enable RS232 / TCP Server. This setting should be enabled by default.
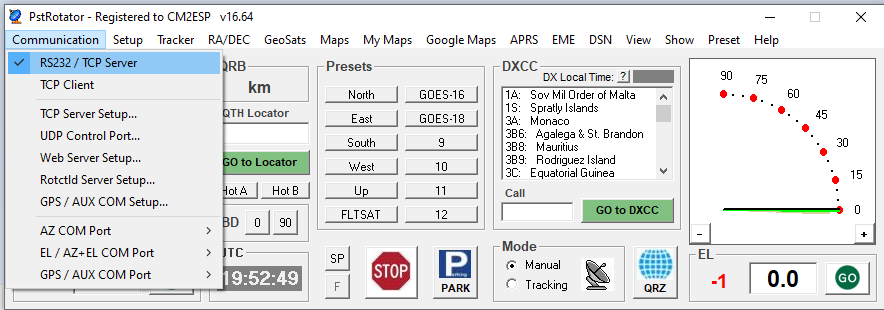
In the
Modebox in PstRotator selectManual. While PstRotator includes internal modules for both satellite and astronomical objects tracking, it’s highly recommended not using them while using it with Satdump to avoid conflicts.It’s also recommended to enable the options
Start in Manual ModeandLocalized KBD Shortcutsin the PstRotator Setup Menu to avoid conflicts and tracking issues.Go to SatDump and select
PstRotatorin the configuration panel.Type the IP Address and TCP port as required (4002 is the default port)
Click
ConnectClick
Engageto start sending commands to the rotator.
Using PstRotator Hamlib Rotctld protocol emulation
Launch PstRotator and configure the settings for your specific hardware rotator controller.
Navigate into Setup Menu and click to enable
Rotctld Hamlib Server. Be sure you don’t have an actual Rotctld instance running as both apps will try to use the same TCP port.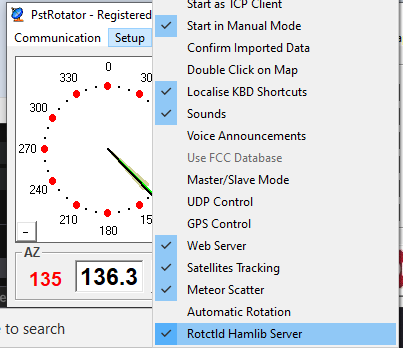
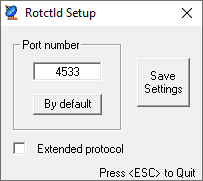
On the Communication Menu, click at
Rotctld Server Setupand check that default port 4533 is selected. Also uncheck and verify thatExtended protocolis not selected. ClickSave Settingsand press Escape to close the config dialog.
Go to SatDump and select
rotctlin the configuration panel. panelWarning
Do not select
PstRotator.Type the IP Address and TCP port as required (4533 is the default port)
Click in Connect.
Click
ConnectClick
Engageto start sending commands to the rotator.